WoodBurning Tips:
The Tapered Point BEst Uses
Of all the solid-point woodburning tips that come with most kits, the tapered point is my least favorite.
It doesn't have very many great uses for art.
And those uses can totally be covered by other tips - better tips if you ask me.
But for the sake of science (and those curious souls like mine) I'm going to tell you all about it anyway.

Want To Learn How To Wood Burn?


Courses are now available on the Burn Savvy YouTube channel membership!
Go see which level suits YOU best. ⇣
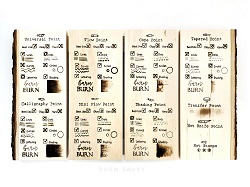
P.S. I made a board for You
I took the top 10 most common tips that come in a solid-point woodburning kit and tried all the pyrography techniques on them.
It shows what pyrography techniques are easy to burn, what took some work, and what techniques are hard for each tip.
Download your FREE copy when you sign up!
Tapered Point Features
It's like a really loooooong cone tip with a really sharp point.
Looks more like it's ready to stab the wood... which is pretty much it's best use.
What I love about the Tapered Point
Not much.
There are a couple things it does really well....
- Both curved and straight lines
Tiny little fine lines are pretty much it's only forte when it comes to actual artwork. But since it's longer than the cone point - which by the way also does tiny lines just fine - it's slightly harder to control.
Remember, the closer your hand can get to the tip, the more control you have.
I figure if you're going to have to work at it anyway, you might as well just use the shading point. It has a nice fine point you can use to get the same effect plus it has a truckload of other helpful uses.
- Deep holes
I'm sure you could make cribbage board holes with this tip if you wanted.
If you have a thin piece of wood - say less than an inch - you could also burn a hole clean through it (that was fun to try). So for things like ornaments, you wouldn't need a drill.
And if it doesn't burn and evenly sized hole all the way through your wood piece, you could turn the wood over and burn from the other direction.
Personally though, I'll just stick with a drill thanks.
What's Okay About it
- Circles
Again, control. Making a clean circle takes a steady hand, so you want to use a tip that is fairly easy to maneuver.
This tip is okay, but it’s hard to control over larger
areas.
The cone point or the shading point would be better.
- Lettering
Same problem with lettering. It works for the tiny stuff, but the larger the letters or the design the harder to control the tip.
Since the point is so thin at the end, it catches easily on the wood grain too. My testing board was basswood, which has a nice even grain. And the tapered point was catching pretty often. It's like it WANTS to dig into the wood.
And being so thin, it's no good for block or print lettering.
What's Hard: Choose a Different Tip
- Shading
Just look at the picture ⇣down there⇣. Don't waste your time trying to shade when I already did that for you.
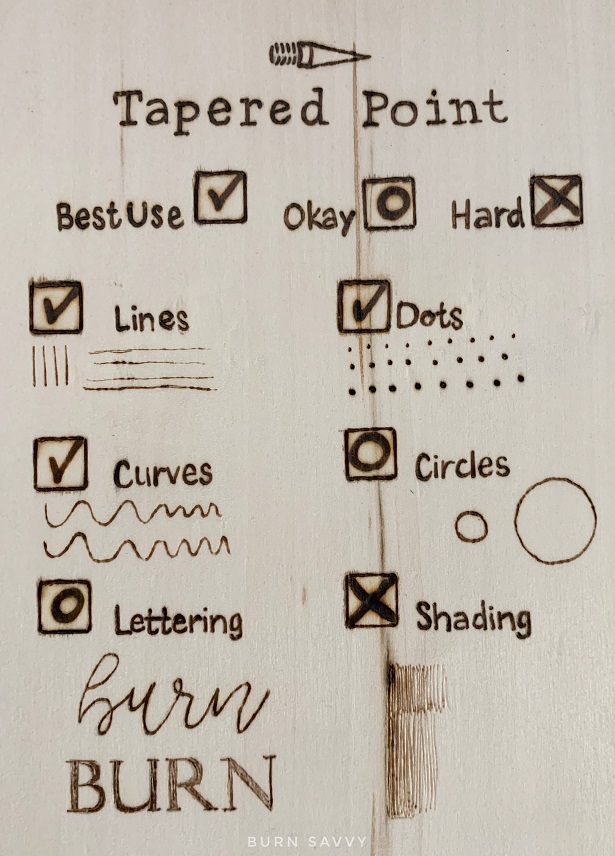
Quick View:
Tapered Point Uses
Best Uses
- Lines - curved or straight
- Creating deep holes
Okay Uses - Not the Easiest
- Circles
- Lettering
Hard Uses - choose a different tip
- Shading
More Woodburning Tips
As I said before, this just isn't my favorite tip.
But I can help you find a better suited tip for whatever project you're working on.
Feast your lovely eyes on this article on the 10 of the most common woodburning tips and their uses over here.
Burn Savvy Home > Woodburning Tips & Their Uses > Tapered Point
Want to seriously up your pyrography game?
I'm spilling my pyrography secrets. Don't miss out on...
- Your FREE guide to woodburning tips & their uses
- Helpful tips, hacks & articles
- First dibs on upcoming courses
- Notice of retreats, challenges, and other pyrography events
- and so much more coming!
So go ahead. Subscribe. Consume. Enjoy.
You deserve it.
⇣ Enjoying your FREE pyrography tips & techinques? ⇣
I am delighted you find them helpful!
If you want some easy ways to give back, here are some ideas that also help YOU level up YOUR wood burning game...
- Watch my YouTube videos (that's totally FREE).
- Buy your woodburning products through my affiliate links which throw me a dime or two at zero extra cost to you (read about affiliate links here).
- Take the pyrography courses that I've poured my heart and soul into helping you burn like a boss!
- Join in the woodburning retreats - that's really like giving back to yourself, actually. ;)
Thanks for helping me keep creating free, delightful, and helpful woodburning content for YOU and pyros like you.
Burn Savvy Home > Woodburning Tips > Universal Point